Paper tape and fiberglass mesh both appear in the drywall aisle, but they are parts of finishing systems rather than interchangeable decorations. Before choosing one, identify the joint, the compound, and the instructions that connect those materials.
The useful question is whether the exact combination is documented for your work. Starting there prevents a familiar mistake: buying tape for convenience and only afterward discovering that the compound you own is not the recommended match.
Start with the joint you are repairing
Describe whether you are finishing a new panel joint, repairing an inside corner, or revisiting an existing crack. Those situations do not necessarily need the same preparation, and a recurring crack should not automatically become another tape experiment.
Look for the boundaries of the material you can identify without opening the wall. If the joint system, board condition, or reason for movement remains uncertain, gather photographs and product information before making a cosmetic repair plan.
A small picture of the crack alone may not show the whole problem. Include a wider room photograph and note nearby doors, corners, or changes in material so the person advising you understands where the damage sits.
This is an observation exercise, not a way to diagnose structural movement. If the condition is changing or the wall has other concerning damage, obtain an appropriate assessment before covering it.
Read the compound label first
A tub of ready-mixed compound and a bag of setting-type powder have different handling characteristics. The distinction matters when the tape maker or finishing-system instructions specify which material belongs under and over the reinforcement.
Do not select the fastest-sounding compound simply because it might reduce waiting. You still need enough working time to prepare the joint, position the tape, and complete the supported application without rushing.
Keep the full product name in your notes. A broad label such as drywall mud can hide the difference between a compound intended for embedding tape and another intended mainly for a finishing stage.
Check the instructions for every proposed substitution. Having used a product successfully on a nail hole does not establish that it is suitable for a reinforced joint.
What USG's comparison actually supports
USG's white paper on matching tape and compound describes paper tape with both drying-type and setting-type compounds in its evaluated systems. It advises against drying-type compound with fiberglass tape and specifies setting-type compound for the fiberglass system it discusses.
Those conclusions come from USG's documented systems and test conditions. They should not be expanded into a promise that every tape carrying a paper or mesh label behaves identically, or that a finished joint will never crack in a real building.
Use the white paper to understand why the pairing matters, then check current instructions for the actual products you intend to use. If another manufacturer's system specifies a different combination, compare that documentation rather than improvising between systems.
Avoid choosing from a single word such as stronger. Joint behavior includes different directions of movement, while a claim about one loading condition is not a universal ranking of every possible repair.
Paper tape needs a supported bedding process
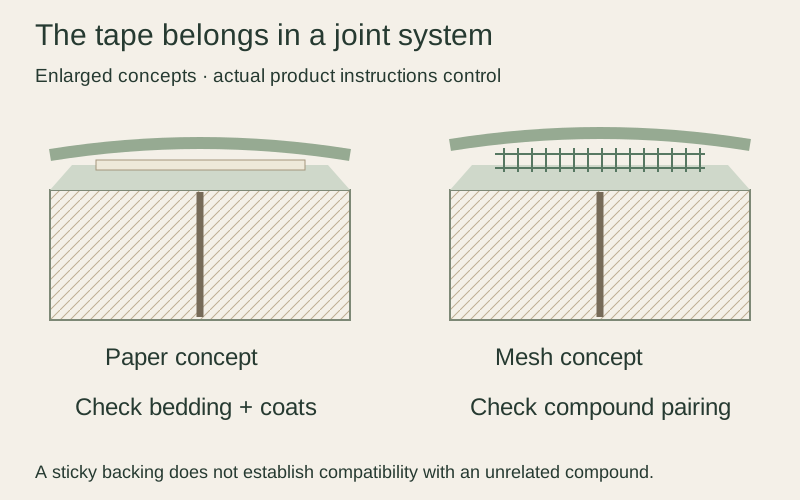
For paper tape, read the compound maker's directions for the bedding coat and tape embedding. The goal is a supported joint treatment, with the specified material placement and the tape positioned as instructed.
Do not treat a nearly dry tool pass or an excessive mound of compound as an interchangeable technique. If you are not sure what the manufacturer means, use its installation guide or a demonstration tied to that same system.
Prepare enough working space to reach the joint comfortably. Trying to manage the tape while standing in an awkward position can turn an otherwise straightforward sequence into a rushed application.
An inside corner also deserves its own instructions. Do not assume that a method intended for a flat joint automatically establishes how you should fold, position, and finish the tape at a corner.
Self-adhesive mesh does not choose its compound
The adhesive on a mesh tape can help position the tape, but it does not answer the compound-compatibility question. Read the complete system instructions before using that convenience as the main reason to buy it.
Check the substrate preparation and the required tape placement. A tape that sticks temporarily to a surface has not thereby demonstrated that the entire finished repair is appropriate for that surface or damage.
Avoid stacking different tapes over an uncertain previous repair. First understand what failed and whether loose material, damaged board, or movement requires a different repair approach.
If the exact product's instructions are unavailable, pause the purchase rather than borrowing a familiar method from a tape with a similar appearance. Product identity is a more useful guide than the color of the roll.
Separate embedding from finishing
A joint treatment can involve more than one operation and sometimes more than one product. Keep the embedding stage, later coats, drying or setting requirements, and surface preparation distinct in your plan.
You may be able to describe the entire job in a short checklist, but that does not make every step interchangeable. A smooth final surface does not prove that the tape underneath was embedded according to the specified system.
Read the instructions before deciding when to move from one stage to the next. A setting reaction and sufficient dryness for decorating answer different questions, which is why the finishing schedule belongs beside the material list.
Do not hide the tape by applying one unusually thick coat unless the system specifically permits that method. More material is not automatically a substitute for the documented sequence.
Plan a realistic first joint
If you are learning, choose a modest project within the manufacturer's repair scope rather than making a highly visible ceiling your first experiment. Practice can help you recognize tool handling and material behavior without claiming professional results.
Lay out the tools, tape, compound, cleanup materials, and directions before mixing or opening anything. Check whether you can complete the intended stage within the working conditions and time available.
Use an expendable practice setup where appropriate and supported. Label the materials you used so a satisfactory practice result remains tied to a particular combination instead of becoming a vague memory that mesh worked once.
Describe what you actually observe, such as a ridge, a bubble, or difficult placement. Those observations can guide another supported attempt or a question to the supplier, without turning a home practice joint into a strength test.
Finish for the light in the room
A reinforced joint still has to become part of a paintable surface. Consider the surrounding texture and the way light crosses the wall before deciding how much finishing work the project needs.
Use the compound and coating instructions for smoothing, cleaning, and priming. Do not assume that selecting the correct tape eliminates the need to prepare the surface for the chosen finish paint.
If the finished joint remains visible, investigate its profile, texture, and coating layers separately. Replacing paper with mesh or mesh with paper is not a reliable response to every appearance problem.
Keep the system information together
Store the tape name, compound name, application directions, and repair notes in one place. If a problem returns, you will have the information needed for a useful conversation rather than a guess about which roll you bought.
Choose the tape as one part of a documented joint system. That approach gives you a clearer purchase, a more manageable work plan, and a better way to judge what happened after the wall is finished.
Before opening a new package, check its storage condition and the maker's usable-life guidance. A clearly identified material in suitable condition is a better basis for practice than a damaged roll or an unlabelled leftover compound.
Make a compatibility note you can read later
Write the complete tape name on one line and the complete compound name beneath it. Add the document that supports their pairing and the operation you intend to perform.
If somebody helps finish the repair later, show them that note before another material is introduced. The physical roll may look familiar while its intended system is no longer obvious from a partly removed label.
Published technical information supports the specific material statements. Room examples and illustrations are original; they are not product tests or a diagnosis of your wall.