You finish painting, put the furniture back, and notice a pale or shiny island where you repaired the wall. Before you add another dab of paint, work out whether you are seeing a surface bump, a different texture, or a difference in sheen.
Those problems can look similar from the doorway, but they do not call for the same fix. A useful repair starts with observation, then follows the instructions for the filler, primer, and paint you actually used.
Start with what you can see
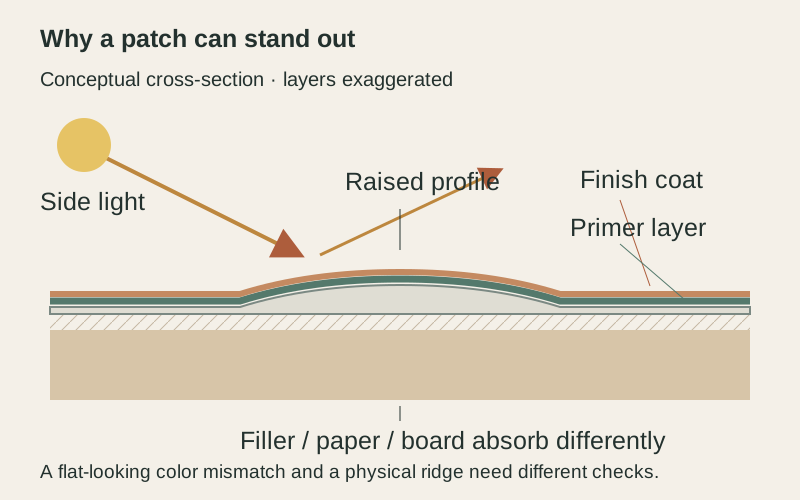
Look at the patch straight on, then move toward the side of the wall. Check it in daylight and again with the room's normal lamps switched on, because a patch that disappears under flat lighting can stand out when light skims across it.
Write down what changes as you move. Is there a shadow around a raised edge, a smooth circle inside a stippled wall, or an area that reflects light differently even though the surface looks level?
You do not need to name the defect perfectly before asking for help. A photograph from the doorway and another from the side, together with the product labels, give a paint supplier more useful information than a description such as “the paint looks wrong.”

Separate texture from sheen
Paint flashing describes an uneven gloss or sheen appearance. Sherwin-Williams identifies several possible causes, including porous surfaces, uneven film thickness, and conditions during drying; a visible patch is therefore a clue, rather than proof of one particular mistake.
A physical ridge needs attention to the surface profile. A difference in absorbency may need the appropriate primer, while a difference in application texture calls for a closer look at how the patch and surrounding wall were coated.
Imagine putting the same paint on a smooth sample board and a lightly textured one. Even with the same color, you would not expect both surfaces to scatter light identically, which is why color matching alone cannot resolve every patch.
Do not sand immediately to see whether that helps. First identify the coating's age and the wall's history, especially if disturbing an older finish could create hazardous dust.
Check the repair layers
Find the filler container, primer label, and paint can if you still have them. Record the exact products, sheen, color, application dates, and whether the patch was primed before the finish paint went on.
Check the filler instructions for drying and preparation requirements. A surface that feels dry is not a reliable substitute for the product's directions, particularly when the repair is deeper than a shallow dent.
Also check whether the paint was intended for that substrate and whether the primer serves the job you need. An adhesion primer, a stain blocker, and a sealer for a porous surface solve different problems, even when their containers all say “primer.”
If the paint was left from an earlier project, note that too. A matching label does not establish that a stored can is still usable or that its appearance will match a wall that has been cleaned, faded, or touched up repeatedly.
Look for a raised edge
Use gentle side lighting to observe the transition around the repair. You are looking for an abrupt edge or a ridge, rather than trying to make the wall look perfect under an unusually harsh inspection light.
If the filler stands proud of the wall, another coat of finish paint is unlikely to change its shape. The surface preparation needs to be reconsidered before you spend more time chasing the color.
For a small, sound cosmetic repair, follow the filler maker's instructions for smoothing and feathering. Keep the work within the repair system's limits, and stop if the paper tears, the board becomes soft, or the damaged area keeps growing.
You may decide that the preparation is beyond the size of project you want to tackle. Taking the product information and photographs to a qualified painter or drywall professional is a practical next step, especially when several previous repairs have left competing layers.
Consider unequal absorbency
A patch can interrupt an otherwise consistent painted surface. Sherwin-Williams recommends priming or sealing surfaces for uniformity and spot-priming patched areas to reduce porosity differences; the appropriate product still depends on the specific substrate and coating system.
Treat that guidance as a reason to read the primer instructions, not as permission to choose any white undercoat. Check preparation, compatibility, application conditions, and the required time before the topcoat.
Keep the repair area clean using the method specified for the products involved. Sanding dust left on a surface is not a new coating layer you want to preserve, but cleaning methods also need to suit the wall and the finish.
If you cannot identify the existing coating, ask the paint supplier what information or compatibility check is needed. An uncertain base is a poor place to experiment with multiple unrelated sealers in quick succession.
Revisit the way you applied paint
Think about the tools and the size of the painted area. A small brush touch-up on a wall originally rolled with a different texture may remain visible even when the paint color is close.
Check the paint manufacturer's recommended applicator and spreading rate. Pressing harder with a nearly empty roller or stretching a small amount of paint across too much wall does not make a useful controlled comparison.
For your next supported application, plan a manageable section and the needed paint quantity before starting. Keep the method consistent enough that you can judge the result, rather than changing roller, pressure, paint mixture, and direction at the same time.
Do not add water or another thinner simply because an online tip suggests it. Any adjustment must be allowed by the exact coating's label or technical instructions, and some touch-up situations are better resolved by repainting a continuous wall area.
Decide how large an area to repaint
A tiny patch is appealing because it looks like the least work. Yet the border between new and old paint can become the next visible difference, especially on a wall with strong side lighting.
Discuss the likely result with the paint supplier before committing to repeated spot repairs. Repainting from one natural boundary to another may produce a more consistent appearance, but it still depends on sound preparation and the chosen coating system.
For example, a wall between two inside corners gives you a clearer stopping point than an irregular circle around a patch. That is a planning example, not a promise that every entire-wall repaint will hide a defective repair underneath.
Allow the coating to reach the inspection stage described by its maker. Judging a still-drying finish and immediately working it again can make it harder to tell whether the original problem remains.
Know when to stop
Pause cosmetic work if you find ongoing dampness, loose material, recurring cracks, or damage that does not behave like a small surface defect. Paint is not a way to investigate or resolve an active leak, and a photograph cannot establish the condition inside the wall.
If the project disturbs paint in a pre-1978 home, review EPA’s lead-safe renovation guidance before proceeding. The task may need a different work plan or a lead-safe certified contractor, depending on the work and circumstances.
At the end, keep a small project record with the products, sheen, dates, and application method. You will have a better starting point for the next repair, and you will be able to describe what changed instead of starting the same guessing game again.
Bring a clear question to the paint counter
If the problem persists, bring a sketch showing the patch location, window direction, and where the difference is easiest to see. Add the filler name and whether the surface was sealed, because the person advising you cannot recover that history from the finish color.
Ask whether the proposed next step addresses shape, absorbency, or application texture. That question helps you avoid stacking another product onto the wall without understanding what it is supposed to change.
Agree on the preparation, application area, and inspection point before beginning again. You then have a defined next step to evaluate, instead of an open-ended cycle of touching up the same spot.
Published product and technical information checked October 22, 2026. Examples and illustrations are original; no product performance tests were conducted.